Showing posts with label recipe. Show all posts

Sunday, February 20, 2011

Date and Apricot Loaf

Several years ago, I asked my mother-in-law for her Date Loaf recipe, because my husband had told me several times how much he loved it. As it was possibly the easiest recipe ever, it's become part of the repertoire! And it's a perfect baking option for those mornings when you desperately need to amuse a two-year-old who has the attention span of, well, a two year old.
Until you realise you don't have enough dates in the cupboard. Thankfully my problem-solving brain is beginning to show some signs of life (finally), so I added apricots to make up the difference. I think the addition was rather nice, though I'm not sure that the purist (husband) thought it was quite as good as the original!

Date and Apricot Loaf

1/2 cup dates, chopped
1/2 cup dried apricots, chopped (or just use a whole cup of dates if you're a purist)
1 cup sugar
1 cup boiling water
1 tsp bicarb soda
60g butter
1 egg, beaten
2 cups self-raising flour
1 tsp nutmeg
1 tsp mixed spice

Preheat oven to 180ºC.

Stir together fruit, sugar, water, soda and butter. When cooled slightly, add egg, flour and spices. Pour mixture into a greased and lined loaf tin, and bake for about 45 mins, until a skewer poked in the middle comes out clean. Serve sliced and buttered if you like, but it's yummy just as is, too.


Thursday, February 3, 2011

my creative space...

Our vege patch is requiring some pretty intense zucchini centred creativity at the moment. To say that they're prolific would be an understatement. This 1.6 kg monster was a stealth zucchini, hiding in the garden until it was so big that we couldn't possibly NOT see it!
In an effort to turn it into an edible meal, I decided to cut it into rounds, cut out the middle and fill the holes with stuffing. It was surprisingly yummy, even if the skin was a little tough. You could use any type of stuffing you liked, but this time I used a pork, basil and parmesan stuffing and cooked it with a basic tomato sauce. Obviously, you don't need a giant zucchini to do this - normal zucchinis cut lengthways and hollowed out would be yummy, too!
Zucchini with pork, basil & parmesan stuffing
(serves 4)

1 extra large zucchini cut into rounds with seeds removed (or lots of little ones halved lengthways with seeds removed)
Olive oil
1 white bread roll
1/4 cup milk, approx
1 small onion, finely chopped
2 garlic cloves, crushed
400g pork mince
1/4 cup fresh basil leaves, finely shredded
1/2 cup finely grated parmesan
salt & freshly ground pepper
1 jar tomato passata
salt & pepper

Preheat oven to 180ºC. In a large, oiled baking dish, place the zucchini in a single layer, rubbing tops of zucchini with a little oil as well. Pull the insides out of the bread roll and put it in a bowl with enough milk to soak through all the bread. Set aside. Fry the onion in a little olive oil until translucent, add half the garlic and cook for another minute then set aside to cool slightly.

In a large bowl, mix together pork, basil, half the parmesan, bread and milk, onion and garlic, and season well with salt & pepper. Divide the pork mixture between the zucchini slices and bake for about 15 mins.

Meanwhile, place remaining garlic in a cold saucepan with about 1 tablespoon olive oil and set over medium heat, keeping a close eye on it and stirring frequently. When it starts to colour add tomato passata (be careful, it will probably spit), bring to boil and allow to simmer for about 10 minutes. Season to taste.

Remove zucchini from oven, carefully pour tomato sauce around the zucchini and sprinkle stuffing with remaining parmesan. Return to oven for 20 mins or until zucchini is tender. You may need to cover the dish with foil if the sauce is drying out or the cheese browns too quickly.

Serve with salad.


The Thursday hub of creativity can be found here. Check it out for some serious inspiration!

Monday, July 19, 2010

A chocolate croissant pudding and a meal plan

Last week, we did some experimenting with the idea of a chocolaty, croissanty, custardy pudding. And we came up with this.
Sliced croissants sprinkled with Grand Marnier and smothered in a rich chocolate custard. Made by my husband, who I think is particularly tolerant of me making statements like "You could try this...", and "What about this..." halfway through making it! So that you can enjoy it yourself, here's the recipe.

Chocolate Croissant Pudding
(Serves 4-6)

3-4 croissants, sliced into 1cm slices
1-2 tbsp Grand Marnier or other liqueur of your choice
200g dark chocolate
500ml milk
3 eggs, whisked
1 tsp vanilla

Lightly grease a baking dish that will fit your croissant slices nicely. Layer the croissants on a slight angle in the dish, and sprinkle with Grand Marnier.

Melt the chocolate (we use the microwave), and add the milk bit by bit, very gradually to start with, until you have some serious chocolate milk. Mix in the eggs and vanilla, and pour over croissants ensuring that there's no chocolate-free bits of croissant sticking up. Leave to stand for 15 minutes, then bake in a moderate (180ºC) oven for 40-45 minutes. Let it sit for 10 minutes before serving, and enjoy!


Now onto other matters. The meal plan for last week again had a serious success (all because of Stephanie Alexander), and a hiccup, because I had a stubborn moment and refused to spend my 'me time' trekking to the fish shop and chose to craft instead (hello fish & chip shop).

This coming week presents a few challenges, namely a couple of single parenting days, a dessert that meets the requirements of the low FODMAP diet (fructose & lactose malabsorption friendly), and a couple of busy days for me which will probably mean T cooking! I just hope he's happy to cook the things I've planned...
Monday: Tomato pasta
Tuesday: Chocolate & almond cake with raspberries and soy ice cream* (The Cook's Companion, p. 227)
Wednesday: Tuna mornay (my version)
Thursday: Sweet potato and broccolini galette (MasterChef #3, p. 40)
Friday: Beef curry (from freezer)
Saturday: Sausages with roast veges & mash
Sunday: Chicken kebabs with vege cous cous (MasterChef #3, p. 70)

*If anyone has any wisdom to impart on the world of soy ice cream, it would be much appreciated! I know there's some decent stuff out there (I've enjoyed it myself!), but I can't remember which one it was. Help?

Tuesday, July 13, 2010

Spanish Chicken Rice

This dish was originally inspired by a recipe that appeared in delicious a few months ago. The flavours are similar, but the approach is a little different. In this version, the rice is cooked in the pan with all of the bits, which means it soaks up lots of yumminess while it cooks. And that's a good thing! But lets be honest, this is just a really good excuse to use chorizo and smoked paprika again, two ingredients that I think are delicious!

While this picture looks like it's been lifted from a 70's cookbook, it's just a night-time iphone pic. I really need a proper camera...

Spanish Chicken Rice
(Serves 3ish - maybe a family of four if the smalls are still little)

1 tbsp olive oil
1 chicken breast, cut into 2cm pieces
1 chorizo, halved lengthways and sliced
1 onion, diced
1 red capsicum, diced
1 clove garlic, crushed
1 tsp smoked paprika
1 cup long grain rice (I used basmati this time)
2 cups chicken stock
400g tin tomatoes, diced

In a large frying pan with a lid, quickly brown chicken pieces in oil over high heat, remove from pan. Reduce heat slightly, and fry chorizo until browned and starting to go crispy, remove.

Fry onion over medium heat for 2 minutes or until translucent. Add capsicum, cook for 1 minute and add garlic and smoked paprika. Cook, stirring for 30 seconds, then add the rice. Cook until the rice starts to crackle gently, add chorizo, stock and tomatoes. Stir to combine and bring to the boil. Add chicken and simmer until rice is cooked (about 15 mins). Check seasoning and serve.

Friday, May 28, 2010

Spanish-ish eggs

When we first moved to Melbourne over 6 years ago, we discovered a cafe on Brunswick St, Fitzroy, called Bakers. Bakers was (yes, was. Sniff. It's now a Thai place, which I'm sure is quite good, but it's not Bakers. Anyway...) Bakers was a claypot and tapas place, with lots of big, bold flavours that I love. But the star of the menu (according to me) was a brekky claypot that involved a fried egg on top of tomatoey chorizo yumminess all drizzled with garlic aioli. (Sigh. No way to fix that craving properly these days...)

Anyway, while attempting to recreate such a dish for breakfast is well and truly beyond me (not a morning person), dinner inspired by it was worth a try. And it was yummy. Different, but still yummy. So I thought I should write it down before I forget what I did!

A couple of notes. I like to boost the chorizo flavour in things like this with smokey paprika, but you could use regular paprika if you needed to. Also, I love roasted potato bits and look for any excuse to use them. I think roasting them adds another dimension to this dish, but you could steam them if you really needed to!
Spanish-ish Eggs

2 tbsp olive oil
2 medium potatoes, peeled and cut into rough cubes
1 onion, diced
1 celery stalk, finely sliced
1 Chorizo, diced
1 red capsicum, cut into large dice
1 large clove garlic, crushed
1 tsp smokey paprika
a generous strip of orange peel, pith removed
1 400g tin tomatoes, chopped
1 1/2 cups chicken stock
1 tbsp chopped corriander, plus extra to serve
4 (or more) eggs

Preheat oven to 190ºC. Toss potatoes with 1 tbsp oil and a little salt & pepper. Roast in the oven for 20-25mins, until nicely cooked.

Meanwhile, in a large deep frypan with a lid, cook onion, celery and chorizo for 3-4 minutes over medium heat. Add capsicum, cook for a further 3 mins then add garlic and paprika and cook for another couple of minutes. Add tomatoes and stock and orange peel, and simmer for about 15 minutes or until most of the liquid has evaporated. Check seasoning, then stir through roasted potatoes and corriander.

Make 4 indents in the mixture and crack the eggs into them. Cover the pan and cook until the eggs are done to your liking (this took about 10-12 minutes for me, but I need my eggs properly cooked at the moment). Sprinkle with extra corriander and serve with tortillas if you like.

Monday, May 10, 2010

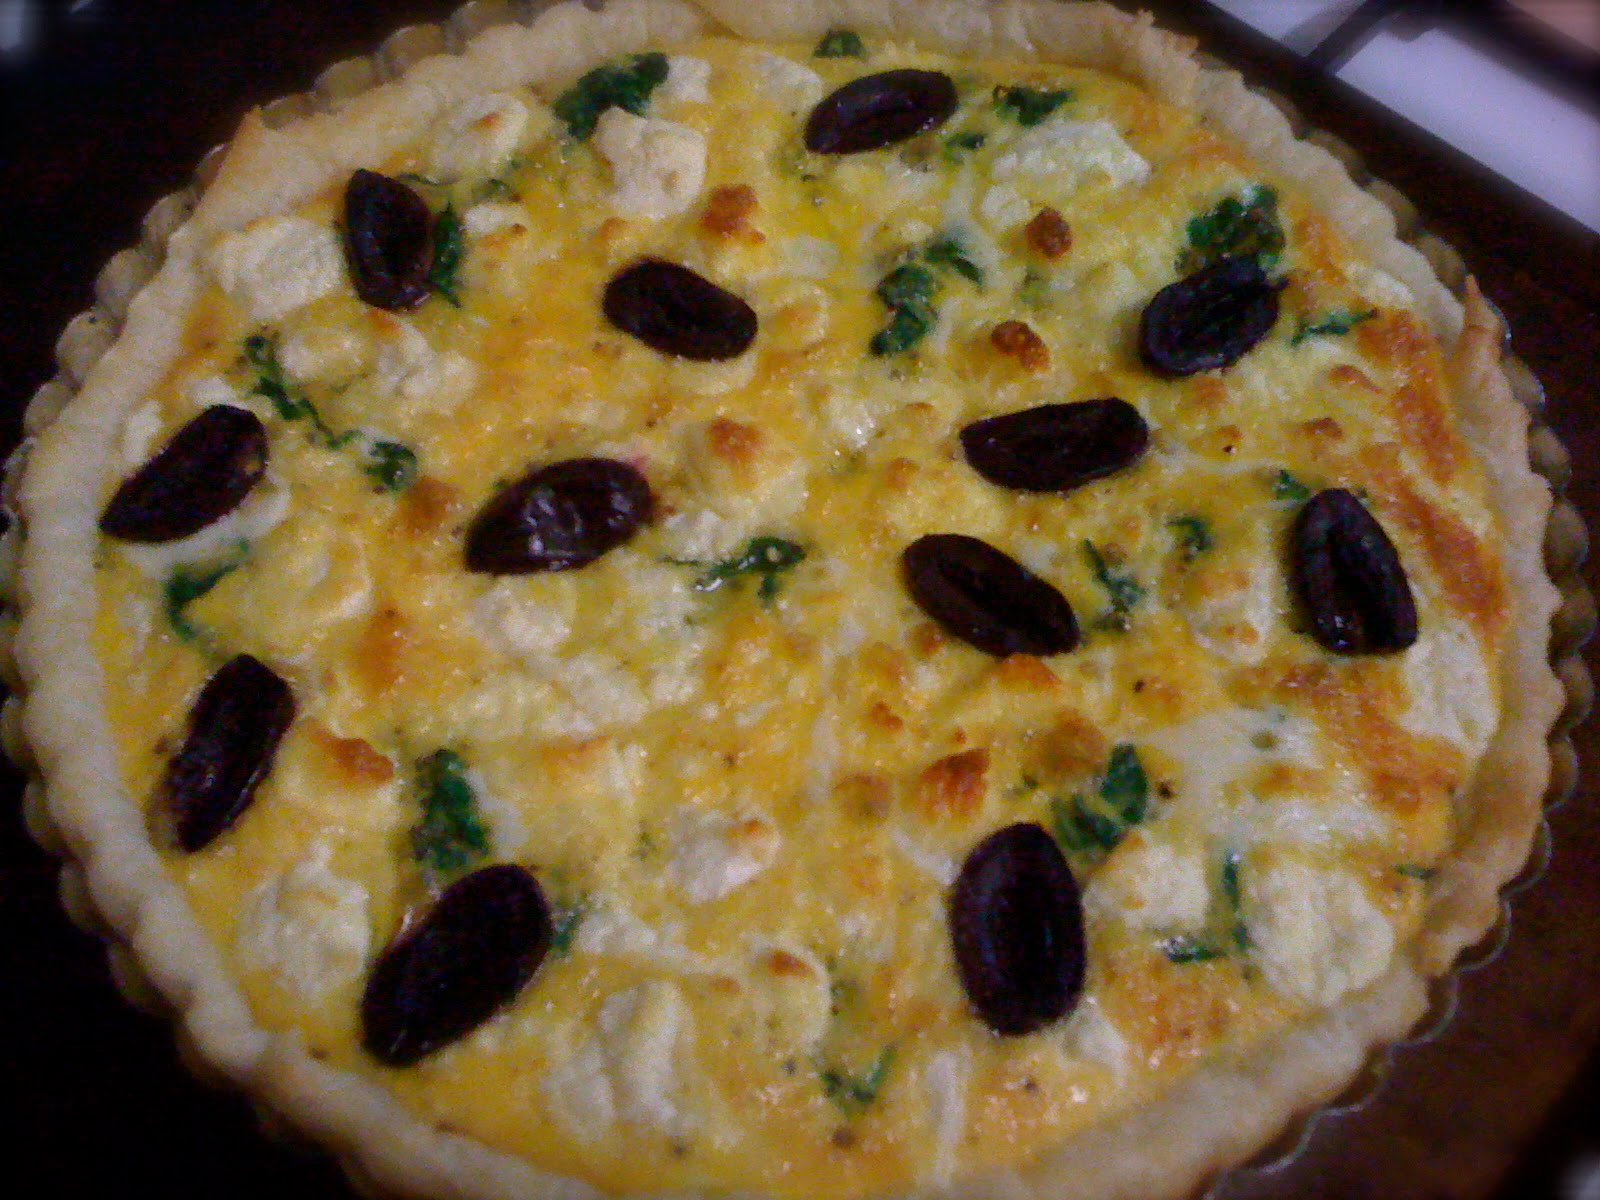
Feta, spinach and olive tart

After a crazy busy week and a half, I managed to find the time for a nap this afternoon! There were several other things on my list of things to do while uber goober was asleep, but a catch up mummy nap won out. I'm feeling rather refreshed for it, so it was definitely worth it! This week has involved handing in an essay, working my first full day of paid employment since going on maternity leave, somehow squeezing in a visit to the Stitches and Craft Show, and a cold. Just to top it all off.

In all of that, I did manage to make a really yummy tart for dinner one night. I think just about anything with feta and olives in it is yummy, so this tart meets that requirement! I used puff pastry with no pre-cooking, but if you have the energy and inclination to blind bake shortcrust pastry (or even make it yourself!), it would definitely further improve the final product. Serving the tart with a green salad and bread would stretch it far enough to feed four.

Feta, spinach and olive tart
Serves 4

1 sheet puff pastry, thawed
1 red onion, thinly sliced
1 tbsp olive oil
1 clove garlic, crushed
100g baby spinach, washed
180g persian feta (or normal is fine!)
4 eggs, lightly beaten
1/2 cup cream
6 kalamata olives, halved and pitted

Preheat oven to 180ºC. Place the pastry into a greased flan tin or quiche dish, pressing it into the corners and filling in any gaps with any bits that overhang the edges.

Cook the red onion with the oil over gentle heat for about 5-10 mins until starting to soften. Add the garlic and continue to cook for another 5 minutes or until the onion is completely soft but not coloured. Set aside to cool slightly.

Wilt the spinach, either in the onion pan or by placing in a colander and pouring a kettle-full of hot water over it. Press out excess moisture.

Spread the onion and garlic evenly over the bottom of the pastry. Spread the spinach evenly over the onion, and crumble the feta over the spinach. Mix the eggs and cream, season lightly with salt and pepper, and pour over the feta. Sprinkle the olives over the tart and place on a tray in the oven for 20-30 minutes until cooked through and lightly coloured on top. Let stand for about 5 minutes before serving.

Enjoy!


Tuesday, April 27, 2010

Preserved Lemons

Yesterday our household took another step toward normality when I (finally) got around to making some preserved lemons. Preserved lemons have been a nearly permanent fixture here since I first discovered them about 10 years ago. Frustratingly, they need to sit for a month to do their thing, so it's another lesson in patience. But it's definitely worth it!

My method is based on Stephanie's from The Cook's Companion, but I tend to opt for the lemon and salt only, mainly because I'm lazy. Stephanie adds bits of bay leaf, cinnamon stick and cloves to hers which are delicious, but these are pretty good, too!

Preserved Lemons

1kg lemons, scrubbed and quartered longways
250g salt

Add 1 tbsp salt to the bottom of a sterilised 1L jar (or 2 smaller ones). Place the lemons and the rest of the salt in a large bowl. Massage the salt into the fleshy part of the lemons, extracting most of the juice. Pack the lemon quarters into the jar with the skin side out, as tightly as you can. Cover with as much of the remaining juice and salt as possible then put the lid on. Wipe any salty juice off the outside of the jar and leave in a cool spot (not the fridge) for at least one month before using.

And on an unrelated note, apparently green crayons taste delicious....?

Tuesday, April 6, 2010

Spiced quinces

We spent the most joyful day on the Christian calendar celebrating at a packed church service in the morning, followed by a relaxed Easter Sunday lunch with family and friends. It seemed to me that this was the perfect opportunity to cook quince, one of my favourite autumn fruits. I love the way that after a few hours in the oven they go from being this odd looking, indigestible yellow fruit to a fantastically rusty red, delicious treat.

This recipe is an adaptation of Nigella Lawson's Autumnal Spiced Plums, which appeared in Delicious a few years ago. With a minor variation replacing maple syrup with strong black tea, the poaching liquid is perfect for quinces. And even though there was considerably more than needed for lunch, we've already finished them!
Spiced Quinces

3-4 quinces
1/2 cup honey
1/2 cup strong black tea
1 cinnamon quill, broken in two
2 star anise
2 tsp balsamic vinegar

Preheat oven to 160ºC.

Peel quinces, cut into sixths or eighths, and core the pieces.* Place the pieces in a single layer in a large baking dish.

Put all remaining ingredients in a saucepan with approx. 350ml water and bring to the boil. Pour syrup over quince and cover dish tightly with foil. Bake in the oven for 3-4 hours until quince is lovely and soft and tender.

Serve warm (not hot) or at room temperature. I like to serve mine with a dollop of cinnamon and honey yoghurt.

*Be very careful here, as quinces are really hard when they're raw, especially around the core. They're also slippery before they're peeled because the skin is kind of greasy, so peeling before cutting can sometimes be a wise idea. It can also help to wash them before peeling and chopping.

Friday, January 29, 2010

Bacon, potato and red capsicum frittata

This frittata is our current favourite, and we eat it at least once a month at the moment. The original inspiration for this recipe came from Meals in Minutes, which is a brilliant cookbook if you're after good, fast, easy meals. It was given to us nearly 12 years ago when we were first married, and we cooked from it at least once a week for a long time! We still use it fairly regularly, so it's definitely stood the test of time.

The original recipe was first modified when we discovered how much yummier it was if we roasted rather than steamed the potatoes. And in the last 6 months, I've substituted the spinach for capsicum and mushrooms, and replaced the cheddar cheese with feta (I use Persian feta at the moment which is unnecessarily indulgent, but yummy). The original was good (obviously, we've been eating it consistently for 12 years), but right now, I think this one's better!

The core of the dish is the potatoes, bacon and onion (and eggs, of course). Playing around with the additional veges is potentially excellent, because you might come up with other great combinations. And obviously, if you'd like to steam the potatoes rather than roasting them, that's OK too! This is the sort of recipe that you can easily extend to feed more by adding extra eggs, potatoes and veges. This version serves 2 on it's own or 3 with a side salad.

Bacon, Potato and Red Capsicum Frittata

2 medium potatoes, peeled and cut into 2cm cubes
2 tbsp olive oil
2 middle rashers bacon, finely sliced
1 onion, finely sliced
1/2 red capsicum (pepper), chopped
3 mushrooms, chopped
3 eggs, lightly beaten
1 tbsp milk
100g feta

Toss the potato with half the oil and salt & pepper. Roast at about 200ºC for 30 minutes or until nicely cooked, stirring occasionally. (Or microwave for approx 5 mins until cooked through).

Heat remaining oil in a medium frypan and fry bacon and onion over medium heat for 10 minutes or until onion is really soft and bacon is just starting to colour. Add capsicum and mushroom and cook for about 5 minutes.
Add potatoes and stir to distribute everything relatively evenly. Combine eggs and milk, lightly season and pour over bacon mixture. Tilt pan until the egg is well distributed, then crumble feta over the top.
Continue cooking on the stove top for a few minutes, then place under the griller until the egg is cooked through. Serve cut into wedges.

Tuesday, January 19, 2010

Moroccan style vegetable stew

We had our first reasonable harvest from the vege patch a couple of days ago. As in, more than a tiny tomato that you carefully cut in half and share as a treat!
Tonight we had a feast using homegrown eggplants, sweet long red peppers and a red onion. I added a few other things as well, but it was rather special to eat a meal made of your own produce! It was really yummy, too!

Moroccan Style Vegetable Stew
(serves 4)

1 red onion, chopped
1 large or 2 small eggplant, diced & salted for 20 mins, rinsed
1 large red capsicum or equivalent, diced
1 clove garlic, crushed
1 heaped tsp Ras el Hanout* or other Moroccan spice mix
400g tin diced tomatoes (or equivalent fresh if you have them in the garden!)
400g tin chickpeas, rinsed
1/2 cup green olives
1/4 cup finely chopped corriander
Natural yoghurt, to serve
Cous cous, to serve

Cook onion in a large frypan with a lid until beginning to turn translucent. Add eggplant and cook for 4-5 mins. Add capsicum, garlic and spice mix and cook until spice mix is lovely and fragrant. Add tomatoes, chickpeas and about 1 cup water. Cook, covered, for about 15 mins or until eggplant is properly cooked through. If the mixture is looking dry, add some more water. Add olives, most of the corriander and check seasoning.

Serve the stew on cous cous with a generous dollop of yoghurt and sprinkle over the remaining corriander. Enjoy!
*Ian Hemphill of Herbie's Spices says that Ras el Hanout is considered to be the ultimate in spice blends, can be made up of over 20 different spices, and 'is subtly curry-like with a spicy yet floral fragrance and robust yet subtle flavour' (Spice Notes, p. 471). If you can get your hands on some, do, it's worth it!

P.S. Apparently when you're 13 months old, chickpeas are de-li-cious!

Monday, November 23, 2009

My place and yours: My collection

This is the tip of the iceberg.
I have a generous collection of recipe books in my house. And within this collection, I have a collection of delicious. magazines. Every single one. I subscribe now to ensure I never miss an issue, and this has worked well except for once when an issue came around the time we moved house a couple of years ago. Apparently even if you re-direct your mail, Australia Post doesn't redirect items over a certain weight. Seriously. Fortunately for me (and my husband who was having to put up with a wife having conniptions) the people who moved into our old house were people we know, so I was able to track it down. L.U.C.K.Y! Because the issue came with a tea towel, which meant everywhere I tried to find another copy had sold out! Did I mention conniptions?

This collection has very recently moved to a new shelf with a door in the kitchen to keep it safe from inquisitive babies! This shelf also now houses my most referred to recipe books. The rest are on another shelf that isn't protected from babies, though there are plans afoot. Fortunately first editions don't make it into my collection: I like using them so they tend to get inadvertently splattered with things. Oops.

Thanks to Kate for coming up with a brilliant theme, and thanks to Pip for hosting!

Sunday, October 25, 2009

spaghetti with smoked trout, fennel and tomato

When we were at the Melbourne Show this year, we managed to sign up for BeerMasons, which is kind of like a wine club for fancy schmancy beer. It's rather fun - you get tasting notes for each of the beers in each pack, and it includes food matching suggestions. One of the beers in the first pack we received is matched with smoked meats. Mmmm. This is a passion we share with one of our cats (who stalks anything smoked: smoked cheese, smoked fish, smoked meats. Slightly annoying when you're not paying attention...).

Anyway, we decided that smoked trout was to get pride of place the other night, but needed to be a little creative. My smoked trout salad has preserved lemon as a key ingredient, but we've run out and I haven't made any more just yet! So I did an experiment that turned out rather well! It's a very quick pasta dish that is perfect for warm spring evenings. The beer was pretty good too!
Spaghetti with Smoked Trout, Fennel and Tomato
(serves 2-4)
approx 100g spaghetti per person
1 fennel bulb
juice of 1 lemon
glug of good extra virgin olive oil
salt & freshly ground pepper
2 fillets or one whole smoked trout
1 tomato, diced
1/4 cup parsley leaves

Cook the spaghetti according to instructions. Meanwhile, slice fennel very thinly (I use a mandoline type thingy), and toss with lemon juice, olive oil, salt and pepper. Set aside. Break trout into chunks, trying to remove as many bones as possible. Once spaghetti is cooked, return to saucepan with fennel, trout, tomato and parsley. Toss, adding more olive oil, salt and pepper if required. Serve!

Tuesday, October 20, 2009

Pancetta and tomato pasta

Just for something different, here is a recipe. If you read between the lines, it's because I'm stuck for ideas, again!! But it's a yummy one....

This is another one of our regular standby favourites. It's based on a recipe I found in Good Taste not long after we got married, which was several years ago now, so we obviously like it. A lot!
Pancetta and tomato pasta
(serves 2-3)

1 tbsp olive oil
1 onion, diced
100g pancetta, diced
1 generous clove garlic, crushed
fresh chilli, to taste (I generally use 1/4 tsp - I'm a bit of a heat wuss)
1 400g tin tomatoes (I get the diced kind)
3/4 cup grated parmesan cheese
salt & pepper
pasta shapes of your choice

Heat olive oil in a frypan, add onion and cook until translucent. Add pancetta, fry for a minute or so, then add garlic and chilli. Cook for a couple of minutes, stirring, then add tomatoes. Bring to the boil and simmer for 5-10 mins.

Meanwhile, cook pasta according to packet directions.

When sauce has thickened slightly, remove from heat and add most of the parmesan, and season. Add cooked pasta and stir until well covered in sauce. Serve with remaining parmesan sprinkled on top.

Sunday, October 11, 2009

Pancetta and white bean pasta

Interestingly, when I'm stuck for something to post, I resort to food. Maybe I'm obsessed?

This recipe came from my sister a few years ago, who I think got it from Donna Hay. I have no idea how closely this resembles the original, but it's really, really yummy! When I cooked it the other night, I included a (very small) handful of peas, because we had some in the garden. It was good enough to possibly become a long term modification!

Pancetta and White Bean Pasta
(serves 2 - 3, but can easily be doubled)

200g pasta (we use hats* (orecchiette) or shells)
1 tbsp olive oil
100g pancetta, diced
Zest and juice of 1 lemon
1 clove garlic, crushed
2 tsp finely chopped fresh rosemary
1/2 tsp chopped fresh chilli, or to taste
1 400g tin cannellini beans, rinsed and drained
a handful of fresh or frozen peas
salt, pepper & good olive oil
parmesan cheese, to serve

Cook pasta in lightly salted boiling water for the time suggested on the packet. The sauce takes less than 5 mins so get the pasta cooking while your preparing the other ingredients!

In a large frypan, fry pancetta in olive oil over medium heat for a minute or so. Add garlic, rosemary, zest, & chilli and cook until fragrant (about a minute). Add beans and peas (if using) and cook, stirring until beans are heated through. Add lemon juice, season and remove from heat. Add cooked pasta to pan with a couple of glugs of good olive oil and stir to combine.

Serve sprinkled with parmesan cheese.

*Note: apparently orecchiette are so named because they resemble little ears. I think they look much more like little tin hats, so that's what I call them.

Wednesday, October 7, 2009

cabbage with bacon and apple

Due to too much blog visiting and not enough crafting, I present to you another recipe....! This recipe is great for using up cabbage that appears in your weekly seasonal box, or in your vege patch. We tend to eat it with pork sausages. A couple of months ago I went into the butcher asking for sausages that would go well with a cabbagy bacony appley thing and got a rather strange look, because he was a bit confused about why the vegetable was my starting point rather than the meat. At least the sausages I ended up with were tasty!

Cabbage with bacon and apple
(serves 2-3 as a side that's really the main event)

1 tbsp olive oil
1 onion, thinly sliced
2 rashers bacon, thinly sliced
1 apple, peeled & sliced
1/4 cabbage, finely sliced
1 tbsp red wine vinegar, or to taste
2 tbsp good extra virgin olive oil
salt & pepper
1/4 cup rouchly chopped parsley

Gently fry the onion and bacon together over medium heat in a large frypan that has a lid, until the onion has softened.

Add the apple and cook until starting to soften.
Add the cabbage and toss about so that the onion mixture is vaguely stirred through. Put the lid on and cook, shaking the pan occasionally, for a couple of minutes or until the cabbage is no longer raw. You want it to still have a bit of crunch.
The problem with taking photos of your dinner is that it's dark. It looks better than this in real life!!!
Remove from the heat, stir through remaining ingredients and serve!